Setup External System Authentication
Administration > Manage External Single Sign-On Authentication Settings
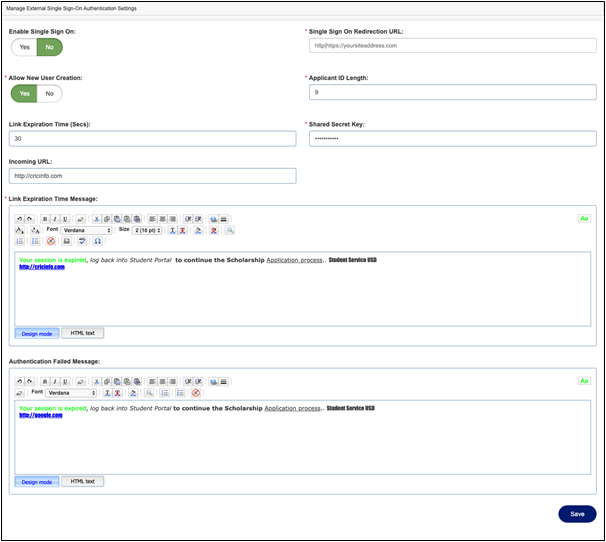
Overview of the External System Authentication Settings
Enable Single Sign-On: Click Yes to activate the Single-Sign-On authentication or click No to disable. Once you select Yes you can complete the remaining settings for the System Authentication setup.
Note: This will also activate the ability to log in as a member or non-member of your organization and will add those option buttons to the login screen that is accessed directly in the Community Force site.
Single Sign-On Redirection URL: This field displays once you click Yes for the Single sign-On setting. Enter the URL of your site address, that is the URL that the applicant will be redirected to if the login attempt fails.
*Allow New User Creation: If a user visits your portal page but does not have an account to login to the Community Force system, this feature will create a new user account for that user.
- Yes – Allows new user accounts to be created on Community Force even if the user does not have an account created on Community Force.
- No – Prevents new user creation. The user will first need to have an account on your site, and it must have been pushed down through integration to the Community Force site.
Note: This also affects the ability of an applicant to create a user account for another individual. If the account information has not already been pushed down from your site to the Community Force site, then an applicant cannot create the account for them, (i.e., Collaboration, Proxy users, and if a Grant Site adds additional employees from your organization.)
*Applicant ID Length: Enter the number of characters the client’s organization allows in their system for the applicant ID.
Link Expiration Time (Secs): Set the length of time in seconds that the Single Sign-On session will timeout if not connected to the Community Force system. When both the application session and the Single Sign-On session timeout, the user will be directed to the Single Sign-On login page to re-authenticate.
*Shared Secret Key: Both Community Force and the client will use the same key, which will send a user to the Community Force system, and in reverse Community Force will be using the same key to confirm the user is valid. This provides safe encryption by verifying that the token comes from a trusted source.
Incoming URL: This is the URL Portal Page or internal login page for your site that the user will be using to log into the Community Force system.
*Link Expiration Time Message: This is a customizable message the user will see when the session has expired (the Link Expiration Time has been reached.)
Design mode – The editor box works similar to Microsoft Word. Type the information into the body of the editor just as you would type and format a Microsoft Word document using the tools present in the editor box.
HTML Text – You can switch to HTML text and create your message using HTML tags with the content. Switch back to Design mode to preview.
Authentication Failed Message: Enter the message that you want your users to see. This is a customizable message the user will see when the authentication fails.
Save: Click Save once you have completed entering the information above.