External System Settings
Administration > Manage Site Settings > External System Settings
The following settings need to be changed if you are connecting to an external data source. Otherwise, they should be set to a default applicable to your organization’s needs or left blank.
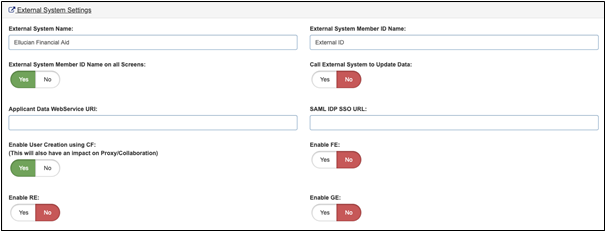
External System Name: The name of the external system with which you are integrating. Enter None if not connecting to an external system. (i.e., Banner, Peoplesoft, or Datatel.)
External System Member ID Name: The name of the identifying number assigned to users in your external system. For example, Banner uses a Net ID, so enter a Net ID for this system.
Note: If not connecting directly to an external system, this field can also be used to manually create an ID code field for applicants that exist in your organization’s external database. For example, FIMS users could enter the FIMS ID. This helps to cross-map the ID fields between your external database and CommunityForce when running reports. Once this field is defined you can add the ID Code to an existing CommunityForce user.
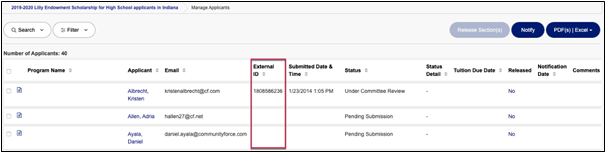
External System Member ID Name on all Screens: If you have populated the External System Member ID Name, this setting when activated will display that Id column on the various data grid reporting areas of the CommunityForce site including Setup Users and the Applicant Status listing reports.
Yes – Activates this column to display in the applicant listing data grids and user setup.
No – Deactivates this column so that it will not display in any reports.
Call External System to Update Data: This feature is used in integration with an external system to exchange data. By default, this is set to No and will only be set to Yes if using integration to exchange data.
Applicant Data WebService URI: Web Service Identifier for the communication to access applicant information. If this is not applicable, leave blank.
SAML IDPSSO URL: The URL for the Security Assertion Markup Language for Single Sign-On. If this is not applicable, leave blank.
Enable User Creation using CF (This will also have an impact on Proxy/Collaboration): This will allow your applicants to create their user accounts as well as accounts for other individuals if using the Proxy or Collaboration features.
This is usually set to Yes unless you are using integration with another site and require the applicant to use their login information from that site and do not want to allow them to create a separate login in the CommunityForce site. (Single Sign-On authentication). If using Single Sign-On and you do not want your applicants to create user profiles for themselves, or Proxy and Collaboration features have been disabled, No should be selected.
Yes – Activates the Create New Account button on the login screen and allows your applicants to create user accounts for Proxy and Collaboration individuals.
No – Removes the Create New Account button from the login screen and applicants will not be able to create user accounts for themselves, or Proxy and Collaboration individuals.
Important Note: If you have selected No and you use the Proxy or Collaboration feature, then the applicant will only be able to choose individuals in that process that already have user accounts created in the system, and they will not be able to create new user accounts.
Enable FE: If using Blackbaud and integrating with FE please select Yes, otherwise select No.
Enable RE: If using Blackbaud and integrating with GE please select Yes, otherwise select No.
Enable GE: If using Blackbaud and integrating with RE please select Yes, otherwise select No.