Create a Post Acceptance Section
Home > (Select - Application Name) > Application Settings > Sections and Questions > Create Section
Post Acceptance Sections are completed by an applicant after they have accepted the original award, to capture additional information such as payment method, travel arrangements for a formal awarding event, reporting on semester grades, etc.
Post Acceptance sections have a special report called the Post Acceptance Report which is located in the Evaluations/Reports dashboard of the application form. This report allows you to see all the activated sections you have created as Post Acceptance sections and shows when the applicants complete them.
Only sections marked as Post Acceptance will appear in the Post Acceptance Report. Post Acceptance sections must contain a Submit Button on the section in order for that section to show as submitted in the Post Acceptance Report section.
There is also a setting in Manage Site Settings that allows the application contact to receive an email when the Post Acceptance Section has been completed – Administration > Manage Site Settings > General Settings > Enable Post Acceptance Section Submit Notification.)
- If set to Yes, an email will be sent to the application contact when the section is submitted.
- If set to No, an email will not be sent.
- The email that is sent can be found in the Notification Center > Templates > Application: Applicant Submit Post Acceptance Section.
For more information on how to view the report, please see the article on Post Acceptance Sections Status Report - Viewing the Submitted Section.
To create a Post Acceptance section:
1. Open an application form and the Sections and Questions menu option will display by default. Click the Add | Create | Clone | Delete Section(s) menu bar and select Create Section.
2. In the Section Type field, select Post Acceptance.
3. Select the following Statuses: Selected for Award and Award Accepted.
4. Complete all other fields as applicable, and keep in mind that all fields marked with an * (asterisk) are required. (Please see the Add a New Section article for a description of each field.)
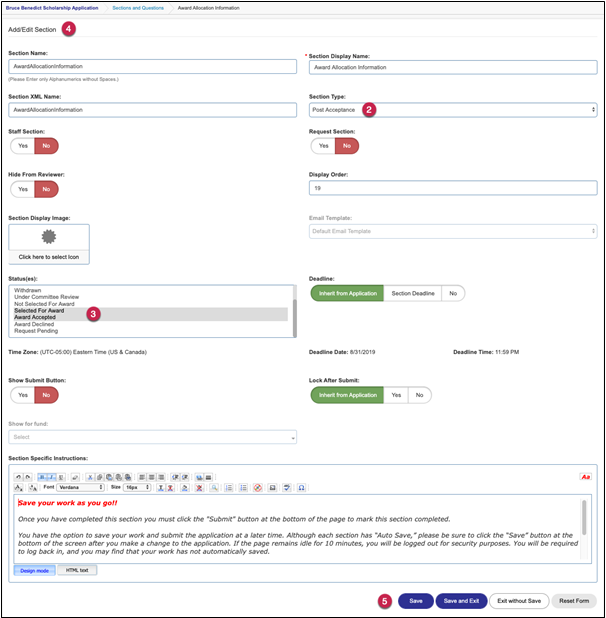
4. Once you have created your section, click the Save and Exit button to save your information and you will be returned to the Sections listing for the selected application.
Save – Click this button to save changes but remain on the form.
Exit without Save – Click this button to exit the form and not save any changes made.
Reset Form – This allows you to cancel and reset the form to start over. All information you have entered will be deleted from the form.