Create a Request Section
Home > (Select - Application Name) > Application Settings > Sections and Questions > Create Section
Request Sections require the applicant to assign (nominate) a designated person to complete a specific section on their behalf.
This section is private and not viewable by the applicants, but the applicant can see when the designee has completed this section or if the designee has rejected their request.
Questions can be created by the Admin that the designee can answer regarding the applicant as well as upload any documents that may be requested from them.
When the applicant enters the designated person's information in the Request section, an email will be sent to that individual with a link and Access Code that they can click on to be directed to the section they are to complete.
This is useful for requesting applicant transcripts, entrance exam scores, letters of recommendation, parent signatures, etc.
If you are using Request sections in your application, you must select the correct Nomination Type when creating the initial application in the General Information Setup; either Single or Multiple.
Important: If using a Request Section, remember that the applicant is not the one completing this section, but it is the designated individual. Therefore, you need to be sure that the section’s instructions in the section setup are directed to the designee, not the applicant. To create the instructions to the applicant, there is a separate setup item in the Application Setup Dashboard called Request Instructions. You must create those instructions, as well, for the applicant so that they are aware of how to nominate their designated individual.
To create a Request section:
1. From the Application Settings tab, click on the Sections and Questions menu option, then click on the menu bar. Select Create Section.
2. In the Section Type field, select Request.
3. Set the Request Section to Yes.
4. Complete all other fields as applicable and keep in mind that all fields marked with an * (asterisk) are required.
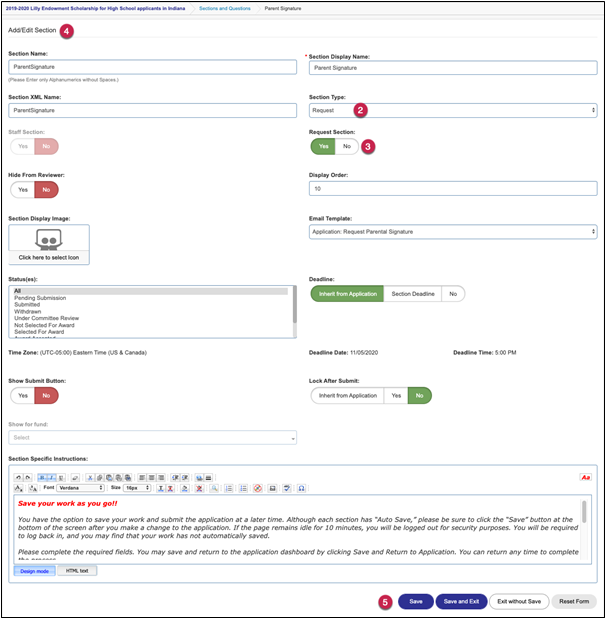
5. Once you have created your section, click the Save and Exit button to save your information and you will be returned to the Sections listing for the selected application.
Save – Click this button to save changes but remain on the form.
Exit without Save – Click this button to exit the form and not save any changes made.
Reset Form – This allows you to cancel and reset the form to start over. All information you have entered will be deleted from the form.