Send Custom Emails from the System
Administration > Global Notification Center > Notify tab
There are two methods within your CommunityForce system to send emails to applicants and other users. The Notify tab in the Administration > Global Notification Center enables you to send emails to applicants with a specific status or status detail. The Notify button in various areas of the system enables users to send emails to specific applicants related to the area from which the email is sent.
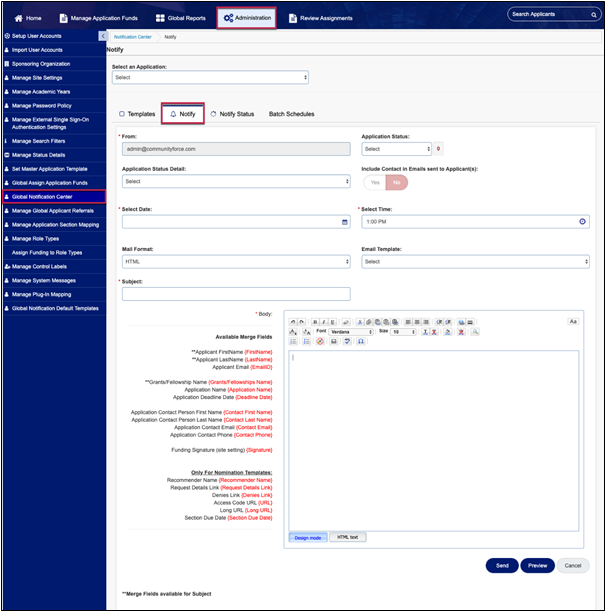
Field Descriptions
From: This is a system-generated address for the sender of the message and cannot be changed.
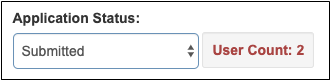
Application Status: Select which status group you want to send the email to. Once you select the Application Status, the User Count to the right will show the total number of applicants to whom the mail will be sent. This will also populate the “To” field with a listing of all the emails for applicants that are in the selected Application Status group. If you do not want to select a group by “status”, then leave the value as Select.
Application Status Detail: Use this field to select a group of applicants by Application Status Detail. Click on the dropdown to see a listing of the Application stages that are available for your funding sources. This will populate the “To” field with a listing of all the emails for applicants that fall are in the selected Application Status Detail group. If you do not want to select a group by “status detail”, then leave the value as Select.
Include Contact in Emails sent to Applicant(s): Select Yes to include the contact designated on the application as a recipient of this email message. Select No to exclude the contact.
Select Date: Select the date you want the email to be sent. Type the date in the MM/DD/YYYY format or click the calendar icon and select a date.
Select Time: Select the time you want to send the email. Click the field to open a list of times and click the desired time.
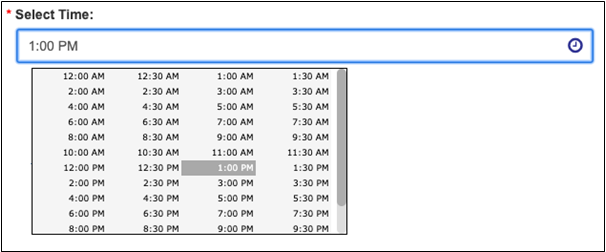
Notes: The email server is on Eastern Time and all times displayed are in that time zone. Therefore, if you are in a different time zone, select a time that corresponds with your time zone. For example, if you need the email to be sent at 4:00 PM Central time, select 5:00 PM since Central is one hour behind Eastern.
An email may be delayed if there is a large volume of traffic at the time the email is being sent.
If you are sending an email to recipients based on a status or status detail, the status/status detail from which the applicants are pulled is as of the time the email is created, not the time it is sent. To ensure the email reaches the correct applicants, refresh the status or status detail group selected by reselecting the group before clicking Send.
Mail Format: Send an email in HTML format or Plain text format.
Subject: Enter the subject of the email that you want to display in the Subject line to the recipient.
Email Template: Select a template from the existing templates and the body of the email populate. If you want to create your email then leave this as Select.
Body: If you selected an email template, the body of the email will be automatically populated. If you don’t select a template, you can write the content of the email in the body field. Content can be entered using one of the following tabs:
- Design Mode: This editor allows you to format text similar to how you would do so in Microsoft Word. Using this feature, you can change the font size, color, style, etc., as well as add additional formatting features to your question as needed.
- HTML Text: Click the HTML text button to create the question using HTML.
Available Merge Fields: The Available Merge Fields listed to the left of the editor’s box can be copied and pasted into your email. When you send an email, these fields will automatically be populated with applicable data. For example, if the administrator chooses {FirstName}, the applicant’s first name will be inserted in the merge field when the email is sent. Please see the Using Merge Fields article for more details.
Note: Do not add extra spaces or delete any of the fields when copying. Each template has specific Merge fields available. If the field, you are looking for is not listed in the column to the left then it is not available for this specific template.
Click the Send button to send the email message to the selected applicants.
Click the Preview button to display an example of how the email will appear once it is sent.
Click the Cancel button to abandon any changes made and return to the Notification Center listing page.